
In this blog post, we will explore how to integrate Supabase with Nextcloud, leveraging the power of both platforms to create a seamless experience for users. Especially with the new support for custom OAuth providers for Supabase Auth integrating those two platforms just got much easier.
What is Supabase?#
Supabase is an open-source backend-as-a-service (BaaS) platform that provides developers with a suite of tools to build and scale applications quickly. It offers features such as a real-time database, authentication, storage, and serverless functions, all built on top of PostgreSQL. Supabase aims to simplify the development process by providing a seamless integration of these services, allowing developers to focus on building their applications rather than managing infrastructure. Additionally, all of their services can be self-hosted, giving developers full control over their data and infrastructure.
What is Nextcloud?#
Nextcloud is a popular open-source file sharing and collaboration platform marketing themselves as “The better Microsoft 365 for private clouds”. But Nextcloud is more than just a file sharing platform, it also offers a wide range of features such as calendar, contacts, and task management, and can be extended even further by their ecosystem of apps easily installable from their app store. Just like Supabase, Nextcloud can be self-hosted, giving users full control over their data.
Use case and benefits of integration#
Nextcloud is a great platform for teams to organize themselves. Depending on the use case though, limits of Nextcloud’s capabilities may be reached, such as when you want to extend the platform with custom features, or when you want to integrate it with other platforms.
For my personal use case in a scout association, we use Nextcloud forms to create a registration form for our events. This works great, but for internal use, we want to take the obtained data and do some further processing on it including:
- Sending out personalized emails as confirmation of the registration with calendar event attachments.
- Creating a dashboard for the organizers that leverages questions present in every form, such as the name and birthdate of the registrant, to display the data in a more user-friendly way and to allow filtering and sorting of the data. In the case of scouts, this allows easily categorizing the registrants by their age into their respective groups.
- Nextcloud forms do not allow altering the submissions for anonymous users, but by merging new submissions into a Supabase database, we can more easily access and alter the data as needed.
Since every user of the Dashboard should only see the data they would have access to in Nextcloud, some kind of authentication is needed. Before the support for custom OAuth providers, this was done by using a custom fork of the Supabase Auth server that integrated Nextcloud as an official OAuth provider. This is a great use case for self-hosting, since you can easily modify the source code and adapt the behavior to your own requirements. I even opened a pull request to upstream those changes to make it available for everyone. But with the new support for custom OAuth providers, this is now much easier and does not require self-hosting Supabase.
Adding a Nextcloud client#
Despite Nextcloud officially supporting OAuth, there are two main issues that make the integration much more difficult than initially expected.
Redirect URI issue#
The first issue is about the redirect URI set in the Nextcloud OAuth client configuration. For Nextcloud, Supabase acts as the OAuth client, so it has to be set as the redirect URI in the Nextcloud OAuth client configuration. However, for the user Supabase is not really a client, so upon successful authentication, Supabase redirects the user to the application with the new session. This means that the overall flow starts by the user initiating the OAuth authentication process from the application, which then redirects the user to Nextcloud for authentication. After successful authentication, Nextcloud redirects the user to Supabase, which then redirects the user back to the application with the new session. Sadly, this workflow is not permitted by Nextcloud, since the last redirect back to the actual application in not in the list of allowed redirect URIs defined by the form action in the Nextcloud confirmation page. This issue is already tracked on GitHub. To circumvent this issue, we need to host our own page to handle the redirect from Nextcloud and then redirect the user to the application with the new session. This is not ideal, but it is currently the only way to make the integration work.
By serving this page, we can circumvent this issue replacing the current page with the Supabase callback url, which can then redirect the user to the application with the new session.
<!DOCTYPE html>
<html>
  <head>
    <title>OAuth Redirect</title>
  </head>
  <body>
    <script>
      // Extract OAuth parameters from URL
      const urlParams = new URLSearchParams(window.location.search);
      const code = urlParams.get("code");
      const state = urlParams.get("state");

      if (code) {
        // Build the actual callback URL
        const callbackUrl = new URL(
          "https://<your-supabase-url>/auth/v1/callback",
        );
        callbackUrl.searchParams.set("code", code);
        if (state) callbackUrl.searchParams.set("state", state);

        // Redirect to your actual callback
        window.location.replace(callbackUrl.toString());
      } else {
        document.body.innerHTML =
          "<p>OAuth error: No authorization code received</p>";
      }
    </script>
  </body>
</html>
Next, we need to add a new OAuth client in Nextcloud for Supabase, which can be done in the Nextcloud administrator settings under “Security” -> “OAuth 2.0 clients”.

Custom user info endpoint#
Before we can continue to add the required configuration in Supabase, we need one more thing for Nextcloud to be properly compatible with Supabase. The current setup would allow Supabase to obtain a Nextcloud access token, but after that the second issue comes into play. Nextcloud does not provide an endpoint to obtain the user information like email and name that is compatible with how Supabase expects it. The email from the Nextcloud session is used for the Supabase identity and data like name is stored as additional provider metadata.
To circumvent this issue, we create our own endpoint that acts as a proxy to the Nextcloud API and returns the required user information in the format expected by Supabase.
One way to do this is using a Supabase Edge Function, which can be deployed directly from the Supabase dashboard or locally using the Supabase CLI. Note that the Authorization header only contains a Nextcloud session, so we need to make sure that Supabase does not try to verify the token itself, but just forwards it to the Nextcloud API.
// --- Configuration ---

const INFO_URL = "<your-nextcloud-url>/ocs/v2.php/cloud/user?format=json";

// --- Server Implementation ---
Deno.serve(async (req: Request) => {
  // No CORS headers - this endpoint is server-to-server only
  const headers = {
    "Content-Type": "application/json",
  };

  // Reject browser requests - check for Origin header which browsers always send
  const origin = req.headers.get("origin");
  if (origin) {
    return new Response("Forbidden: Browser requests not allowed", {
      status: 403,
      headers,
    });
  }

  try {
    const nextcloudHeaders = new Headers(req.headers);

    // Remove headers that are specific to the client-proxy connection.
    nextcloudHeaders.delete("Host");

    // Nextcloud requires this header for the ocs endpoint
    nextcloudHeaders.set("OCS-APIRequest", "true");

    const nextcloudRes = await fetch(INFO_URL, {
      method: req.method,
      headers: nextcloudHeaders,
      body: req.body,
    });

    const respJson = await nextcloudRes.json();
    const ocsData = respJson.ocs.data;

    const userResp: any = {};
    userResp.sub = ocsData.id;
    userResp.iss = new URL(INFO_URL).hostname;
    userResp.name = ocsData.displayname;
    userResp.email = ocsData.email;
    userResp.website = ocsData.website;
    userResp.phone = ocsData.phone;
    userResp.locale = ocsData.locale;

    const res = new Response(JSON.stringify(userResp), {
      status: nextcloudRes.status,
      headers,
    });
    return res;
  } catch (error) {
    console.error("Proxy Error:", error);
    return new Response("Internal Server Error", {
      status: 500,
      headers,
    });
  }
});
Now we got everything together on the Nextcloud side, we can finally add the custom OAuth provider in Supabase.
Adding Nextcloud as a custom OAuth provider#
The custom Nextcloud OAuth provider can either be added through the admin auth sdk or through the dashboard.
I’ll show here how to do it in the dashboard by navigating to “Authentication” -> “Sign In / Providers” and then scrolling to the bottom to “Custom Providers”. By clicking on “New Provider” we just need to fill in all the endpoints we already have set up and according to the Nextcloud OAuth documentation:
- Authorization URL: https://<your-nextcloud-url>/index.php/apps/oauth2/authorize
- Token URL: https://<your-nextcloud-url>/index.php/apps/oauth2/api/v1/token
- Userinfo URL: https://<your-supabase-url>/functions/v1/proxy-userinfo
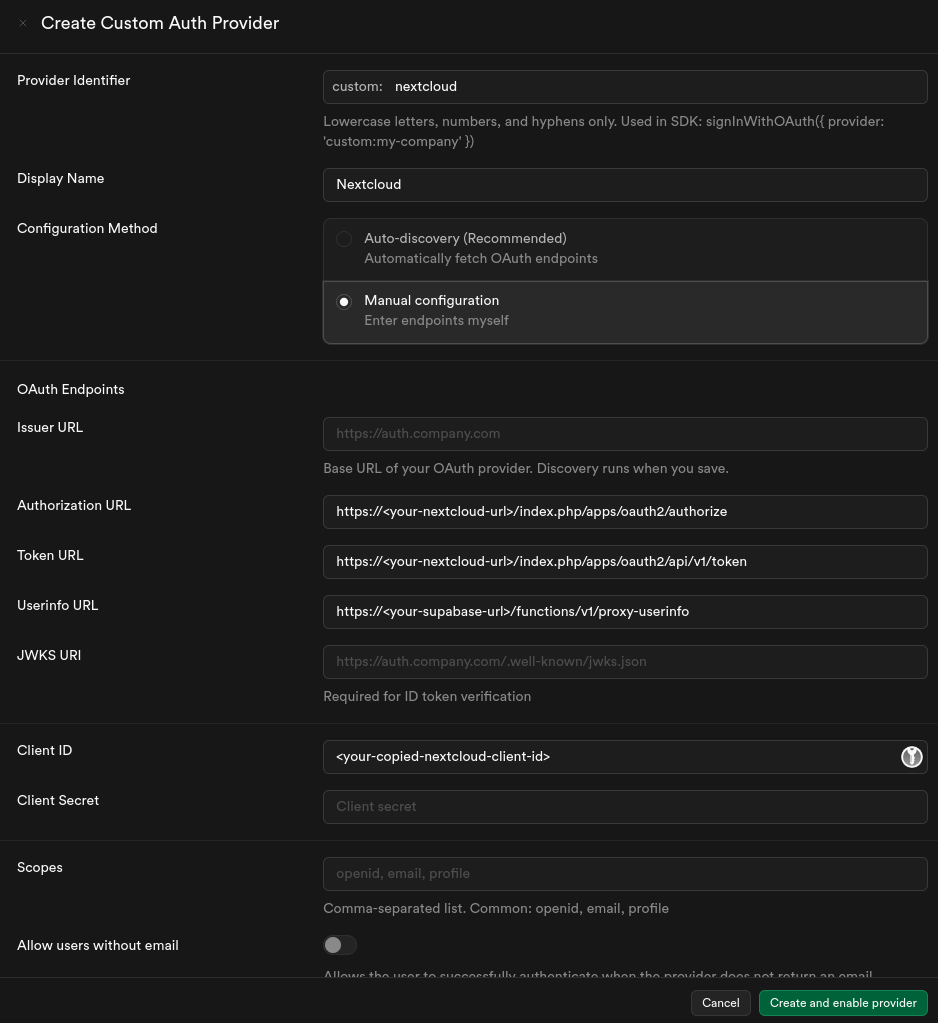
Note that Nextcloud does not support different scopes currently, so we can just leave the scope field empty.
Usage in the application#
Our application is built with Flutter, but the authentication flow is similar for most platforms. Note that the implementation does not differ much from the built-in providers, but works seamlessly with the existing Supabase Auth API.
import 'package:supabase_flutter/supabase_flutter.dart';
// ... Usual Supaabse initialization
await Supabase.instance.client.auth.signInWithOAuth(
OAuthProvider("custom:nextcloud"),
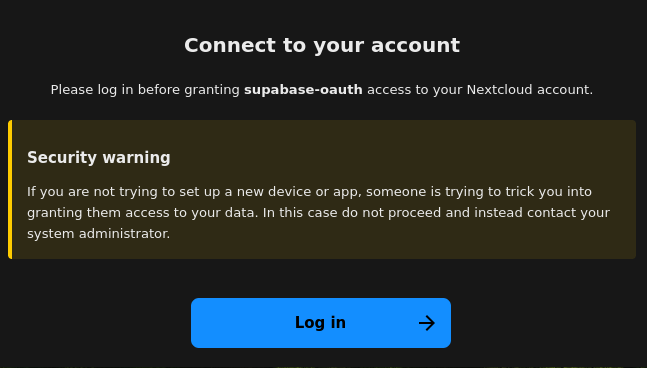
);This will trigger the OAuth flow, which will redirect the user to Nextcloud for authentication. On the first page, the user is informed about the process and which OAuth app is requesting the authentication.
After logging in, the user is asked to confirm the authentication and give the OAuth app access to their Nextcloud account.
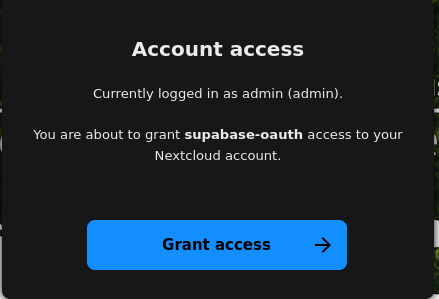
After granting access, the user is redirected back to the application with the new session, which contains the Nextcloud access token and refresh token in the providerToken and providerRefreshToken fields respectively.
The session can be obtained as usual by listening to the onAuthStateChange stream, which will emit a new session after the OAuth flow is completed.
Supabase.instance.client.auth.onAuthStateChange.listen((event) async {
    if (event.event == AuthChangeEvent.signedIn) {
      final session = event.session;
      if (session != null && session.providerToken != null) {
        // The initial Supabase session after the OAuth flow contains
        // the Nextcloud access token and refresh token in the
        // providerToken and providerRefreshToken fields respectively.

        // You can use these tokens to make authenticated requests to
        // the Nextcloud API on behalf of the user.
        final ncAccessToken = session.providerToken!;
        final ncRefreshToken = session.providerRefreshToken!;
      }
    }
  },
  onError: (error) {
    // Handle error
  },
);Conclusion#
Integrating Supabase with Nextcloud allows teams to reuse their existing Nextcloud instance for authentication and data storage while leveraging the powerful features of Supabase for building custom applications and dashboards. While there are some challenges to overcome, such as the redirect URI issue and the lack of a proper user info endpoint in Nextcloud, with some workarounds, it is possible to create a seamless integration between the two platforms for the user.
Reply by Email